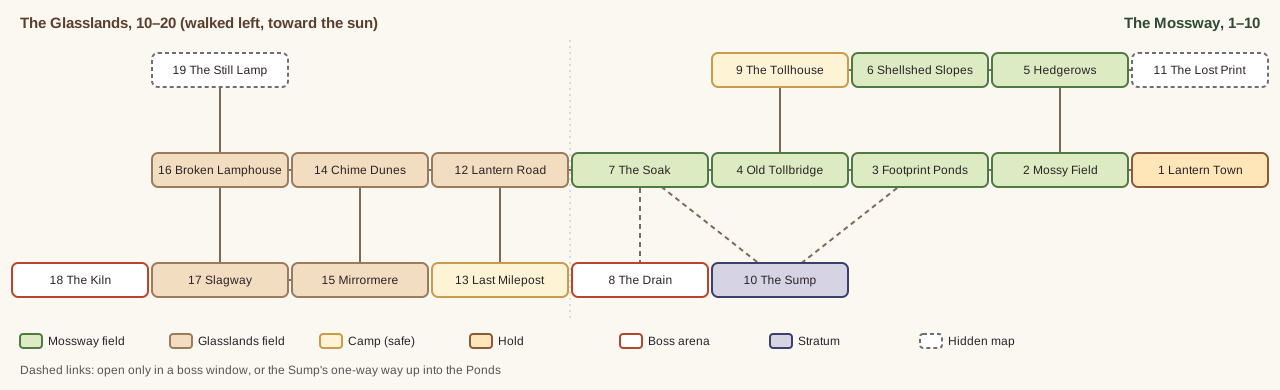
The launch content, place by place. 01-world.md holds the lore behind
it; read its section 1 before writing a quest past level 30. Levels here
are content bands for writers and map builders; 03-systems.md owns the XP curve,
monster stats and drop tables, and may shift a band by a few levels.
Every monster marked H is a Lampghost: it carries a stolen ember, glows in its own coldlight tint and releases motes when put out. Unmarked monsters are ordinary creatures, machines or people.
Map budget. Each region is at most six
surface maps plus two strata (the dark layers under the
surface, built from strata kits in 05-art-audio.md). Boss arenas,
event maps, safe towns, holds and the instanced prologue do not count.
The Deep (08-scale.md §4) sits
under the strata and is assembled from pieces. A region ships at the
density bar in 08-scale.md §9
or not at all. Regions 1–5 ship at launch; 6–8, 9 and 10 ship with Acts
III, IV and V (D1).
| # | Region | Levels | Titans that pass | Theme | Kind of dark | Signature visual | Unique mechanic or hazard |
|---|---|---|---|---|---|---|---|
| 1 | The Mossway | 1–10 | Mossback (kneels about half of each loop) | Meadows grown in a titan’s old footprints | Honey dusk: warm, long shadows, safe | A line of round footprint lakes stepping to the horizon, ringed with lantern-lilies; his shell on the skyline | Footfall: while Mossback walks, tremors shake fruit loose, bounce small monsters and sway ropes |
| 2 | The Glasslands | 10–20 | Mossback (north rim), Greyhorn (Glassbreak) | A plain of fused lantern-glass where the Cinder Eye eats flames | Smoky amber lit from cracks below | Dunes of melted glass full of the ghost-shapes of lanterns; wind chimes everywhere | Reflections: Mirrorkin are visible only in glass; the Eye’s Sweep drains lanterns caught in its gaze |
| 3 | Tallowmere | 20–30 | Mossback (Wickshore), Ystra (songwater rain) | A fen of white wax from sunken Concord chandleries | Milky pearl fog, wax glowing from within | Half-sunk candles tall as towers with frozen drips; reeds that are wicks | Softwax: wax platforms soften under you; stand still too long and you sink through |
| 4 | The Furrows | 30–42 | Greyhorn (docks and charges) | Red badlands ploughed into canyons by Greyhorn’s charges | Rust-red dust dusk | Parallel trenches a kilometer long; horn plates as big as houses | The Charge: a dust wall crosses the map; get onto ledges or be swept |
| 5 | The Cloudshelf | 42–55 | Ystra (moors here) | Peaks above a cloud sea, the last place the sun still shines | The dazzle: real sunlight, in which Lampghosts are nearly invisible; pitch black under the cloud | The sun huge and low over gold cloud tops; Ystra anchored to a peak by chains | Cloudline: every map has a sunlit top and a dark underside; drop through the cloud to switch |
| 6 | The Combs | 55–68 | Moth Queen (roosts every Glow), Greyhorn (south mouth) | Canyons honeycombed with the Moth Queen’s old cocoon cells | Deep violet, wing-glow; floods with cold light in the Under | Cliffs of hexagonal cells lit like windows; glowing silk ropes | Silkways: silk ropes that monsters cut and that re-spin on a timer; the Under changes the map |
| 7 | Lowlight | 68–80 | None dock (the Moth Queen passes over in the Under) | The dark country of the Stay, lit by caged Lampghosts | True dark, lit cold blue by coldlight farms | Stilt villages; wicker cages of soft blue light like fireflies in jars; blue crops | Shutter: a bright lantern pulls Lampghosts from far off and angers the Stay; shuttered is stealthy but weak |
| 8 | Highnoon | 80–92 | Greyhorn (east gate), Ystra (high, in the Long Song) | The Concord capital, frozen at a quarter past three | Stale gold light trapped in mirrors; deep dusk outside them | Tower-high mirrors angled at a sun that isn’t there; bronze tap-needles on cradles | Mirror relay: turn mirrors to throw light into dark streets; Held Hours, pockets where time is stopped |
| 9 | Wend’s Fall | 92–106 | Wend (dead); the Moth Queen lands on its skull | The cooling body of a dead titan | Red heat-dusk, dimmer every Turning | Ribs as cathedral arches; ash falling like snow; 14,000 lanterns still lit on its back | Cooling: ember veins pulse warm and cold; warm veins refill lanterns, cold ones release Wendlings |
| 10 | The Sunfoot | 106–120 | All four at the Convergence | The land under the sun’s foot | Glare-dark: blinding horizontal light and pitch-black shadows a mile long | The sun’s disc filling half the sky; the golden Sunlift scaffold | Long Shadows: shadows are solid, walkable and move as the sun sinks; Glare overcharges lanterns in direct light |
| Now in the game | Becomes |
|---|---|
| Lantern Town | Lantern Town, Mossback’s hold. The current map is the Rim (the lowest ring, where the Stair arrives): 1920 u of curving shell in three tiers, the Shade and Warden Lodges on the west terrace, the hearth and storage hall in the middle, the Kindler and Ranger Lodges on the east rise, and the head of the Pilgrim’s Stair at the east edge with the way down to Mossy Field at its foot. Every Lodge has a ground-level door, a walkable balcony and roof, and ladders between them. |
| Mossy Field | Mossy Field, the first field of the Mossway, levels 1–4, at the foot of the Pilgrim’s Stair. Built (map 2), with Footprint Ponds (map 3) and the Old Tollbridge (map 4) east of it, portals both ways. |
| Slime | Puddling (H), the Mossway’s first monster. Kids still call them slimes. |
| Cave bat | Dimwing (H), first met under the Old Tollbridge in the Mossway and in the Drip in Tallowmere. |
| Skeleton | Afternooner (H): Lampghosts that ate the Concord dead and wear their last ordinary afternoon. First met as the Tollkeeper (Mossway), then everywhere the Concord lived. |
| The Cinder Eye | The Cinder Eye, open-world boss of the Glasslands (level 20), in its lair the Kiln. Returns as the Cinder Choir (106) and the Second Noon (raid). |
| The slice’s four fields and boss map | Mossy Field, Footprint Ponds, the Lantern Road and Chime Dunes, then the Kiln (boss). The slice’s 1–20 band is the first two regions. |
| Region | Upper stratum | Lower stratum |
|---|---|---|
| The Mossway | the Sump | Old Tollvault |
| The Glasslands | Underglass | Slagdeep |
| Tallowmere | the Drip | the Rendering |
| The Furrows | Trenchbottom | the Shedworks |
| The Cloudshelf | the Underbrim | Cloudfoot |
| The Combs | the Cocoonery | the Brood Deep |
| Lowlight | the Sunken Road | the Drowned Bell |
| Highnoon | the Taplines | the Undercroft |
| Wend’s Fall | the Ember Veins | the Marrow |
| The Sunfoot | Undershadow | the Sunlift Pits |
Strata are darker, denser and better-paying than the surface above
them, and with the Deep they are the only places where the lantern burns
and motes must be carried home (03-systems.md §6.5, §7.2). A
stratum’s level band is its surface region’s top half; the lower stratum
runs a few levels past the region’s cap.
Each region past the Furrows has one standing NPC and one custom that players meet without a quest.
| Region | NPC | Custom |
|---|---|---|
| The Cloudshelf | Brother Amos Reel, a lone kite-skiff mender at Mooring Spire | Pilgrims tie a scrap of cloth to Ystra’s chain for a safe crossing; the chain is ragged with them. |
| The Combs | Wicky Lune, a scale-sweeper child who sells directions | Nobody lights a lantern in the Under within sight of the Roost; you shutter and bow. |
| Lowlight | Gammer Oake, who names every caged Lampghost | The Stay leave a bowl of blue grain at each cage at dawn-bell. |
| Highnoon | Clerk Ambrose Vell, the last living Concord archivist, still filing | Locals stop every clock they pass at a quarter past three, out of habit. |
| Wend’s Fall | Leftlamp Nell, a Leftlamp who does not attack and lets you help | Visitors light one of Wendhome’s lanterns from their own before they leave; never the reverse. |
| The Sunfoot | Sister Glare, a blind Westwalker pilgrim who survived | Travelers walk with their backs to the sun and speak of it only in the past tense. |
Holds are separate maps reached by Return Lantern, the Tetherline, or
on foot when docked (01-world.md section 5).
| Hold | Titan | Maps |
|---|---|---|
| Lantern Town | Mossback | The Rim (arrival, Lodges, storage), Shellstep (terraces, farms), Tailend (market), the Wick (Lamplighters, the Vent), the Brow (lookout, Pathfinders’ Lodge) |
| Brazenbrow | Greyhorn | The Saddle (smithies, Warden Hall), Hornfast (Horncutters), the Burn (forge-tap, Hornheart entrance), the Gimbal Inn |
| The Almanac | Ystra | Fluke Landing, the Domes (reading rooms, kitepost), the Kindling Hall, the Stacks, the Long Clock |
| Lampblack | Moth Queen | The Scale Stair, the Weave (homes, shops), the Velvet Market (Under only), the Hush (Shade school) |
| Wendhome | Wend (dead) | Part of Wend’s Fall; see region 9 |
Mossback has walked this ground for three hundred years. Every footprint became a pond and every pond grew a meadow. The safest place below the holds, and the place where the most Lampghosts fall, because Lantern Town lights more lanterns than anywhere.
Maps | Map | Levels | Notes | |—|—|—| | Pilgrim’s Stair | 1 | Instanced prologue map (does not count toward the six): ropes and ladders down Mossback’s foreleg, always played during a staged Kneeling. In the live world it is a shortcut open while he kneels. | | Mossy Field | 1–4 | The canon first field. Moss mounds under two tiers of low platforms, Puddlings on every tier: a dense grinding field in MapleStory’s mould, about 14 kills a minute solo. Built as map 2: Puddlings, Mossnips and Dandlehops at eight spawn points of three, 6 s respawn (3 s for the Puddlings’ points). The west half is Puddlings only, five points within one screen (x 250–700) on the ground, the mound and two platforms; the two Mossnip points are on the east ground (x 1460 and the x 1700 mound), the Dandlehop on the east high platform (03 §1.2, first-field tuning). | | Footprint Ponds | 4–7 | A chain of pond-craters; lily-pad platforms that dip when stood on. The newest print is at the far end. Built as map 3: four craters you wade, a low, middle and high lily pad over each; Dandlehops, Shellmites and Thornpigs at nine spawn points, the first crater a Dandlehop point (03 §1.2). The pads do not dip yet. | | Dewline Hedgerows | 5–8 | Tall hedges grown in lines; vertical climbing through branches. Built as map 5 (§6.3). | | Shellshed Slopes | 6–9 | Where shed scutes pile up; curved plate platforms; shell-mites. Built as map 6 (§6.3). | | The Old Tollbridge | 8–10 | A Concord bridge that crosses nothing; the riverbed is moss. Dimwings roost underneath. Built as map 4: a 1054 u three-span stone bridge, Dimwings in the riverbed (three points), the Tollkeeper (its own kind, 14) on the deck at three points. | | The Soak | 9–10 | Boggy edge toward the Glasslands; the Puddle Mayor’s map. Built as map 7 (§6.3), with only its way back to the Tollbridge so far. |
Build sheets for every Mossway map, its camp (the Tollhouse), the Sump and the Puddle Mayor’s arena (the Drain): §6.3.
Monsters | Name | Lvl | Look and behavior | |—|—|—| | Puddling (H) | 1–3 | The slime. A wobbling drop of sea-glass-aqua pond water with its ember low in the belly; hops, leaves glowing wet prints. | | Mossnip (H) | 2–4 | A beetle wearing a clump of moss like a hat; nips ankles, rolls into a ball when hit. | | Dandlehop (H) | 3–5 | A rabbit made of dandelion fluff; puffs seed clouds that blur the screen edges. | | Teacup Puddling (H) | 4 | A rare Puddling that ate someone’s teacup and wears it; drops a teacup. | | Shellmite | 4–6 | Crab-sized lice off Mossback’s shed scutes. No stolen ember: the game’s first non-Lampghost, taught by a quest. | | Thornpig (H) | 5–8 | A hedgehog that ate a hedge; rolls along platforms and drops off edges. | | Dimwing (H) | 7–9 | The cave bat. Dives at lanterns; a hit dims your light for a few seconds. | | Tollkeeper (H) | 9–10 | An Afternooner (skeleton) in a faded toll-collector’s coat; blocks the bridge and swings a lamp-pole. Drops Concord coins. | | Snagcat (H) | 7 | A cat that ate a bramble; pounces from shelf to shelf in the Hedgerows. | | Rustpuff (H) | 8 | A puffball of rust-colored moss spores drifting over Shellshed Slopes. | | Bog Puddling (H) | 9 | A heavier Puddling of brown bog water; the Soak. | | Runlet (H) (proposed) | 10 | A piece of the Puddle Mayor racing back to rejoin it. |
Open-world boss: the Puddle Mayor (10). A Puddling the size of a cottage that ate a drowned Concord mayor’s chain of office and tricorn hat. Splits into Puddlings at each quarter of its health; the pieces race back to rejoin it, and putting them out before they arrive is the fight. Spawns in the Soak, where every Puddling in the Mossway drains in the end.
Quest line: The Lighting. The Stair, Fen Cobble and
the Lighting at the Vent; Mossy Field; Reeve Tamsey’s lantern count; Old
Ponder’s Small Steps (sample text in 01-world.md 10.4); the Shellmite
lesson (“not everything that bites is a Lampghost”); the Tollkeeper’s
coins, which Mote at the Almanac will later date to the year of the
Setting; the Puddle Mayor; induction at your Lodge.
The pilgrim road west from the Mossway, lined with lanterns of the dead. For a year the Cinder Eye has been eating their flames and leaving the glass, melted, behind it. The plain rings in the wind.
Maps | Map | Levels | Notes | |—|—|—| | The Lantern Road | 10–14 | Old road lined with lantern posts, most of them dark; Gilded Hour bounty board. | | Chime Dunes | 13–16 | Glass dunes with chimes hung by pilgrims; sound carries, so packs come. | | Mirrormere | 14–17 | Flat mirror-glass; Mirrorkin show only in the reflection below your feet. | | The Broken Lamphouse | 15–18 | Ruined Guild waystation; vertical ruin climb; the missing Lanternbearers’ empty lanterns. | | Slagway | 17–20 | Cracked glass over glowing slag; vents puff heat that lifts you. | | The Kiln | 20 | The Cinder Eye’s lair: a crater bowl of glass. The slice’s boss map. | | Glassbreak Fields | 15–20 | Opens one Glow per Turning after Greyhorn crosses; shattered paths to buried lanterns. |
Build sheets for every Glasslands map, its camp (the Last Milepost) and the Kiln: §6.4.
Monsters | Name | Lvl | Look and behavior | |—|—|—| | Wickwren (H) (proposed) | 10 | A wren that ate a lantern wick; perches on the dark posts of the Lantern Road. The road’s Lampghost, so the Dim lesson has something to hide. | | Glassback | 10–12 | A beetle with a shell of fused lantern glass; reflects arrows and spells off its back. | | Cinderling | 11–14 | Flecks of the Cinder Eye’s fire with tiny eyes; fly straight at the brightest lantern. | | Mirrorkin (H) | 12–15 | Seen only in reflections; wears a blurred copy of the player’s own class silhouette. | | Chimehound (H) | 13–16 | A dog that ate a wind chime; its howl rings every chime on the map and calls the pack. | | Lamplicker (H) | 14–17 | A long lizard with a longer tongue; licks your lantern and leaves it guttering. | | Pilgrim Afternooner (H) | 15–18 | Skeleton pilgrims in sun hats, walking west forever; hostile only if you block the road. | | Slagworm | 17–19 | A worm of molten glass that rises from cracks and hardens where it lands, making new platforms. | | Lostbearer (H) | 18–20 | Wears a Lanternbearer who went missing here: their coat, their dark lantern, their walk. Quest-linked; names match missing-persons notices. |
Open-world boss: the Cinder Eye (20). A floating molten eye the size of a cart, lidded with plates of fused lantern glass. Its gaze sweeps the Kiln like a lighthouse beam; caught in it, your lantern drains and Cinderlings home on you. Hide behind glass pillars, which it melts one by one. At low health it weeps: embers fly west and the fight ends with a sound like a kettle. A Gilded Hour agent collects the largest ember.
Quest line: The Lantern Road. Missing-persons notices on the Lantern Road; warm empty lanterns in the Broken Lamphouse; the Lostbearers (put out, they drop the missing people’s names, which you return to their families in Lantern Town); Gilt-Captain Lucan Sallis’s ember bounty; the Kiln. A Lamplighter files your report and tells you not to think about where the embers went.
The Concord’s chandleries sank here when the lamps failed, and three centuries of wax and tallow flowed into the fen. It is white, soft and faintly warm, and it glows from inside.
Maps | Map | Levels | Notes | |—|—|—| | Wickshore |
20–22 | Guild outpost Wick Station; Mossback’s dock in the last part of
his loop (01-world.md §5). | |
Reedmere | 21–24 | Wick-reed beds; reeds are climbable and burn if lit.
| | Candlestump Isles | 24–27 | Islands of giant half-sunk candles;
climb the frozen drips. | | The Pour | 26–29 | A frozen wax waterfall
you climb against softening ledges. | | Chandler’s Sink | 28–30 |
Rooftops of the sunk factory town; the Gutterworks entrance. |
Monsters | Name | Lvl | Look and behavior | |—|—|—| | Waxtoad (H) | 20–22 | A toad with a wax-drip back; spits warm wax that slows. | | Wickheron (H) | 21–24 | A heron wearing a lit wick for a beak; stabs from above while standing in the reeds. | | Dimwing (H) | 22–25 | Larger cave bats swarming the Drip; hits dim lanterns. | | Gutterling (H) | 23–26 | A candle stub on legs with a sputtering flame; bursts when put out, melting the floor under it. | | Dripcrab | 24–27 | A hermit crab living in a Concord candle jar; tucks in and becomes a platform. | | Moorwisp (H) | 25–28 | A floating light that looks like a Lanternbearer’s lantern; leads you off solid wax. | | Fenspinner (H) | 26–29 | A spider that spins wick thread; its webs are climbable ropes until it bites them. | | Chandlerling (H) | 27–30 | Afternooner apprentices carrying trays of tapers; throw lit tapers in arcs. |
Open-world boss: Old Gutter (30). A toad as big as a house wearing a sunk candle tower as its shell. It eats lantern light to grow its wick; the bigger the flame, the more of the arena floor softens. Players douse its wick with fen-water buckets from the edges, and that is the Snuffers’ trick, which a Snuffer named Ivo teaches you before he douses your own lantern and runs.
Dungeon: the Gutterworks (section 3.1), entrance at Chandler’s Sink.
Quest line: The Wick Harvest. The wick-harvesters vanish one by one; Moorwisps are leading them into soft wax. First EVERY WICK A WOUND graffiti on the Wick Station wall. A Stay trader sells coldlight jars on the sly and won’t say where from. The Gutterworks and the Chandler’s ledger (“Tap 41, Aun”), which the Guild confiscates. End of Act I.
Greyhorn’s country. Every Turning he charges through and ploughs another trench. The Horncutters camp in the shed horn plates and mine them. The Lampghost herds graze here because Greyhorn’s fire falls here.
Maps | Map | Levels | Notes | |—|—|—| | Hornrest | 30–32 | Greyhorn’s dock: chain lifts up his leg. Horncutter camp, Dockmarket. | | Long Furrow | 31–35 | A trench a kilometer long; floor and ledges; Charge lane. | | Scrapewall | 33–37 | Cliff scored by horn marks; vertical climbing on scrape ledges. | | The Shedfields | 35–39 | Fields of shed horn plates; Horncutter claims; claim-jumpers. | | Dustgut | 37–41 | A storm canyon; gusts push you sideways. | | Herdhome | 39–42 | Open bowl where the herds gather; the Bellwether. |
Monsters | Name | Lvl | Look and behavior | |—|—|—| | Dustcalf (H) | 30–33 | A calf made of red dust; herds of five; stampede in a line when one is hit. | | Pickrat | 31–34 | Rats wearing dropped miners’ helmets with candle stubs; steal ore from your drops. | | Rustbuzzard | 33–36 | Buzzards that circle after a Charge and dive at anyone left on the trench floor. | | Hornflea | 34–37 | Fleas the size of dogs that fell off Greyhorn; enormous jumps. | | Dustdevil (H) | 36–39 | A Lampghost that ate a whirlwind; a funnel of grit that pulls you in. | | Drover Afternooner (H) | 37–40 | Concord cattle drovers in wide hats, still driving the Lampghost herd; whip-crack knockback. | | Claim-jumper | 38–41 | Renegade Horncutters cutting live stone off Greyhorn’s sheds; human, flee at low health. | | Herdmother (H) | 39–42 | A great cow with an ember as big as a hearth; calls Dustcalves. |
Open-world boss: the Bellwether (42). A bull-shaped Lampghost that ate a Concord bell tower and wears it as a yoke. Every toll calls a stampede across Herdhome; players take the ledges, then strike while it rings. When put out, every one of its motes streams to Greyhorn, and he stands quiet for three days.
Quest line: Greyhorn’s Temper. Hornspeaker Gell’s worry; the gimbal houses tearing loose; the Horncutters’ strike over the Deepening (side with Mags Cutter or the Forgemother; the outcome is the same, the reputation differs); claim-jumpers; the Bellwether, and Gell’s “he wasn’t angry, he was hungry.”
Mountain peaks above a sea of cloud. Up here the sun still shines, low and gold and cold, and Ystra moors to a spire to bask. The light is so strong that Lampghosts, whose own glow is drowned by it, are almost invisible: a shimmer in the air. Under the cloud it is pitch black.
Maps | Map | Levels | Notes | |—|—|—| | Mooring Spire | 42–44 | Ystra’s anchor chains; kite-skiff port to the Almanac. | | Cloudwalk | 43–47 | Rope bridges between peaks; updraft columns. | | Stargazer’s Shelf | 45–49 | A Concord observatory ruin; brass Sentinels. | | Rookery Crags | 49–53 | Cliffs stacked with Cragrook nests; items crows stole from your drops sit in the nests and can be climbed back. A Lampblack fence buys nest-finds. | | Hailmount | 52–55 | The summit; hailstorms; the Dusk Roc. |
Monsters | Name | Lvl | Look and behavior | |—|—|—| | Shimmergoat (H) | 42–45 | A mountain goat that is only a heat-shimmer in sunlight; solid and blue under cloud. | | Cloudray (H) | 43–46 | A flat manta that skims cloud tops; rams you off bridges. | | Cragrook | 45–48 | Crows that steal one item from your drops and fly to their nests in Rookery Crags. | | Orrery Sentinel | 46–49 | A Concord brass automaton that still tracks the sun and focuses it into beams. | | Lantern Eel (H) | 47–51 | Under the cloud: dangles a false light, lunges from the dark. | | Rimehare (H) | 49–52 | A hare that ate a frost; leaves ice on platforms. | | Astronomer Afternooner (H) | 50–53 | Skeletons at telescopes, writing the sun’s height in ledgers; throw ink. | | Songeater (H) | 51–55 | A Lampghost that ate a phrase of Ystra’s song; its hum silences skills nearby. |
Open-world boss: the Dusk Roc (55). A roc-shaped Lampghost that ate a sunset: wings of torn orange cloud. It dives between the sunlit top and the dark underside of Hailmount; above cloud it is invisible except for its shadow on the cloud; below, it is bright and visible but the players are in the dark. Parties split between layers and call it out.
Quest line: The Long Clock. Kite-skiff to the Almanac; Reckoner Quarle’s measurements; Songeaters attacking Ystra’s song; Provost Aumbry’s telescope wing and her generous Lanternbearer stipends; Quarle’s chart (the sun drops faster after each titan death), which Aumbry reads over your shoulder; the council buries it. Then Hornheart (section 3.2) ends Act II.
Canyons honeycombed with hexagonal cells: the Moth Queen’s old cocoons and nursery. She roosts against the canyon walls through the Glow, and Lampblack hangs in her fur. Silk lines run everywhere and glow. In the Under she takes off, and the canyons fill with cold falling light.
Maps | Map | Levels | Notes | |—|—|—| | Silkfall Landing | 55–57 | The canyon rim; the Scale Stair down to Lampblack. | | Hexwall | 56–60 | A cliff of cells; climb cell to cell. | | Dustriver | 61–64 | A river of shed wing-scale that flows like sand; currents carry you. | | Smugglers’ Seam | 63–66 | Hidden tunnels; moth-skiff docks; Velvet Market overflow in the Under. | | The Roost | 66–68 | The Queen’s oldest cocoon, high on the canyon; the Pale Tenant. |
Monsters | Name | Lvl | Look and behavior | |—|—|—| | Scaleflit | 55–58 | Small natural moths drawn to your lantern; swarm, nibble, scatter when you shutter it. | | Combcrawler (H) | 56–60 | A larva-shaped Lampghost that crawls out of cells and seals you in silk. | | Silkcutter (H) | 58–61 | A mantis that cuts silk ropes, dropping anyone on them. | | Lampfaker (H) | 60–63 | Wears a moth that ate a lantern; flashes like a Lanternbearer calling for help. | | Duster (H) | 61–64 | A cloud of wing-scale dust with a stolen ember; blinds, reveals stealthed players. | | Unlicensed | 62–65 | Cutthroats thrown out of the Moth Court; human; steal brass. | | Hexmother (H) | 64–67 | A brood Lampghost filling a whole cell; births Combcrawlers. | | Gilded Prospector | 65–68 | Gilded Hour agents in gold-leafed masks, gathering Cinder embers that drift here. |
Open-world boss: the Pale Tenant (68). A Lampghost in the shape of a small Moth Queen, living in her oldest cocoon: the last piece of her own absence she did not take back. It flies only in the Under, mirrors her wing patterns and silences the canyon. When it is put out during Act III’s server event, its motes pour into the Moth Queen and her true wing-light shows for good. This happens once per world; afterwards the Pale Tenant returns as an ordinary boss that replays the fight for rewards.
Quest line: The Queen’s Secret. Smuggling runs in the Under for Ferrant Gale; Nan Corvina’s lantern test (she keeps yours a Bell, and returns it with a crack in the glass); Gilded Prospectors trying to scrape the Queen’s wing-light; a Guild inspector asking questions you must answer or lie to; Lisle and the truth; the Pale Tenant.
The dark country under the old titan roads, where the Stay have lived for three hundred years without heartfire. They keep Lampghosts in wicker cages, feed them, and grow blue crops in the light they put out. Heartfire is rude here.
Maps | Map | Levels | Notes | |—|—|—| | Stairfoot | 68–70 | A Concord ladder that climbs to nothing: where a titan used to kneel. | | The Cagefields | 69–72 | Coldlight farms; don’t break the cages. | | Underhay | — | The Stay’s stilt town; safe map, vendors, Ruth Underhay. | | Blackwater Fen | 72–75 | Black water that douses lanterns on contact; Snuffers fill buckets here. | | Quietwood | 74–77 | Trees that drink light and sound. | | The Old Dock | 76–78 | Wend’s old docking place: platforms and lifts going up into empty air. |
Monsters | Name | Lvl | Look and behavior | |—|—|—| | Blindhound (H) | 68–71 | Eyeless dogs that hunt by warmth; a shuttered lantern hides you. | | Jarbreaker (H) | 69–72 | An escaped farm Lampghost still wearing its wicker cage; the Stay want it back unharmed. | | Glimsnail | 70–73 | Big natural snails with blue shells that the Stay ride; aggressive when riderless. | | Hush Owl (H) | 72–75 | An owl that ate a silence; swoops and mutes. | | Sootbear (H) | 74–77 | A bear made of soot; smothers lanterns when it hugs. | | Snuffer Zealot | 75–78 | Human; carries a bucket of black fen-water; douses lanterns in an arc. | | Wendling (H) | 77–80 | Shed from Wend’s Absence: bigger than they should be, studded with bits of titan bone. | | Weeper (H) | 76–79 | Wears a Stay mourner; walks between cages crying; harmless until you strike a cage. |
Open-world boss: the Drowned Bell (80). Fought in the arena at the bottom of the Drowned Bell stratum. A Lampghost that ate Wendhome’s great bell after the Fall and sank with it into Blackwater Fen. When it tolls, every lantern on the map goes out for a few seconds and the fight is in coldlight only. Put out, the bell rings once, clearly, and far away in Wend’s Fall something stands up.
Quest line: What the Stay Kept. Earn Ruth’s trust by shuttering your lantern; the Cagefields’ quiet economy; a Snuffer recruiter taking Stay youth (Pell Dimmock among them); Hob Sallow’s sermon at the Old Dock; the song of the Tapping; the Drowned Bell.
The capital of the Concord, frozen when its lamps failed. Every clock reads a quarter past three. Tower-high mirrors still aim at where the sun used to stand; some of them caught the last of the old daylight and hold it, so whole halls glow with stale afternoon. Afternooners go on with the afternoon.
Maps | Map | Levels | Notes | |—|—|—| | The Gate of Hours | 80–82 | The east gate; Greyhorn’s dock (he charges the walls). | | Gilt Row | 81–84 | Gold-leafed mansions; the Gilded Hour chapterhouse. | | The Tapyards | 83–86 | Where the taps were built: bronze needles hundreds of meters long on cradles. Aun’s bones. | | Mirror Gardens | 85–88 | Mirror relay puzzles; Held Hours. | | Sundial Plaza | 87–90 | A plaza that is a sundial; its shadow is the map’s moving platform. | | The Orrery Steps | 89–92 | Entrance to the Orrery; the Afternoon Prince’s court. |
Monsters | Name | Lvl | Look and behavior | |—|—|—| | Footman Afternooner (H) | 80–83 | Skeleton servants carrying trays and parasols; polite, then very much not. | | Leafeater (H) | 81–84 | Ate gold leaf; peels off in flakes that cut; drops gold leaf. | | Gilt Magistrate (H) | 82–85 | An Afternooner judge; hurls verdicts (debuffs named after Concord laws). | | Tapwalker | 84–87 | A bronze spider-machine built to climb sleeping titans; drills. | | Mirrorsprite (H) | 85–88 | Lives in the mirrors; steps out behind you. | | Hourguard (H) | 86–89 | Afternooner soldiers in sun-plate; march in formation, raise shields together. | | Sunlancer | 88–91 | Gilded Hour soldiers with lances tipped in stolen heartfire. | | Aunling (H) | 89–92 | Fragments of Aun’s absence, the first Lampghost, in the Tapyards; old, slow and huge, with an ember like a banked hearth. |
Open-world boss: the Afternoon Prince (92). The Lampghost that ate Tamsin Aurel IV, last Sun-Prince, wearing her sun crown and reading her last decree aloud: “Let the afternoon be lengthened.” It fights inside a Held Hour: time stops for everything except the Prince and whoever is standing in the mirrors’ light. Players rotate mirrors to keep each other lit.
Dungeon: the Orrery (section 3.3).
Quest line: The Taps. The Gilded Hour’s chapterhouse, still friendly; the Tapyards and Aun’s bones; the Stay’s song matches the Concord records; Quarle arrives with the finished model (titans’ walking turns the world); Aumbry explains the Second Noon; the Orrery; the Afternoon Prince. End of Act III.
A titan lies on its side across a valley. Its ribs make arches; ash falls like snow; ember veins pulse under the skin and are dimmer each Turning. Wendhome on its back is empty and every one of its fourteen thousand lanterns is still lit.
Maps | Map | Levels | Notes | |—|—|—| | Wend’s Tail | 92–95 | Entry; a road up the tail. | | Ribvault | 94–97 | Under the ribs; vertical arches. | | Wendhome | 95–98 | The empty hold; Leftlamps tending lanterns. | | The Gilt Harvest | 99–102 | Gilded Hour tap-rigs draining the veins. | | Wend’s Brow | 101–104 | The skull, where the Moth Queen lands; Hob Sallow’s camp. | | The Heartgate | 104–106 | Entrance to the Heartchamber. |
Monsters | Name | Lvl | Look and behavior | |—|—|—| | Wendling (H) | 92–95 | As in Lowlight, more of them; their motes rise and scatter with nowhere to go. | | Mourning Ashmoth | 93–96 | The Moth Queen’s moths, grieving; neutral unless a lantern is lit near them. | | Ribcrawler (H) | 94–97 | Wears the parasites that lived on Wend; crawls on ceilings. | | Leftlamp (H) | 95–98 | Wears Wendhome’s people; tends lanterns and fights only to protect them. | | Veinmaw | 97–100 | A fire-worm living in warm veins; erupts when the vein pulses. | | Gilt Harvester | 99–102 | Gilded Hour tappers in heat-suits with drill rigs. | | Heartmite | 101–104 | Mites drawn to the heart’s heat; swarm. | | Cinder Choir fragment | 103–106 | Small re-forming Cinder Eyes that sing in harmony; heal each other. |
Open-world boss: Hob Sallow and the Black Tide (104). Hob calls a wave of black fen-water over Wend’s Brow to drown the embers so no one can take them. He fights from inside the wave; the wave douses lanterns and drowns ember veins, so the arena darkens as the fight goes on. Players light veins to push the water back. He doesn’t die: beaten, he watches the motes scatter and stops.
Dungeon: the Heartchamber (section 3.4).
Quest line: Wend’s Wake. Wendhome and the Leftlamps; Dorrit Sallow’s message to her brother; Oda Wickham’s letter opened; the Gilt Harvest rigs; Hob and the Black Tide; the Heartchamber. End of Act IV.
The land directly under the sun’s foot. The disc fills half the sky. Every surface has a blinding west face and a black east face, and shadows run a mile long and are solid enough to walk on. The Gilded Hour’s Sunlift, a golden scaffold tower, is being built here to raise the Second Noon.
Maps | Map | Levels | Notes | |—|—|—| | Sunward Approach | 106–108 | The walk in; glare grows. | | The Glare Flats | 107–110 | Open salt flats; no cover; Glare at its worst. | | Shadowstride | 109–112 | A map made of shadow bridges that swing as the sun moves. | | Aumbry’s Camp | 111–114 | The Gilded Hour’s camp; lance batteries aimed at Wend’s Absence. | | The Sunlift Foundations | 113–116 | The base of the tower; machinery. | | The Gilt Spire | 115–118 | Climbing the scaffold. | | The Convergence | 118–120 | Event map (does not count): where the four titans meet in Act V; the raid entrance. |
Monsters | Name | Lvl | Look and behavior | |—|—|—| | Glarehound (H) | 106–109 | Bleached, half-invisible dogs; only their shadows are solid. | | Longshadow (H) | 107–110 | A Lampghost that is only a shadow; stretches across a map and trips. | | Westwalker (H) | 108–111 | Afternooners who walked west for three centuries and reached the sun, bleached white. | | Sunlancer Captain | 110–113 | Gilded Hour officers; lance volleys. | | Cindersworn | 111–114 | Gilded Hour soldiers who have taken Cinder embers into their bodies; burn and explode. | | Duskdrinker (H) | 113–116 | A huge Lampghost drinking horizon light; the sky darkens around it. | | Noonling | 115–118 | Tiny false suns that bob and burst white. | | Titanshade (H) | 117–120 | Pieces broken off Wend’s Absence; titan-scaled limbs. |
Open-world boss: Wend’s Absence (120, server event). A hole in the shape of a titan, four hundred meters long, wearing the land it walks over. It cannot be put out, and it must not be. It walks toward the Sunlift, after its own fire, and the Gilded Hour’s lance batteries are trying to break it before it arrives. Parties draw it away from the batteries with lantern-light, break the Titanshades it sheds, and destroy batteries. Success moves it to the Convergence map, where it waits for the raid.
Quest line: The Second Noon. The Glare; Aumbry’s
camp and her last offer; each Listener’s question to their titan (01-world.md 8.8); the Convergence
over one Turning; the Second Noon rising in every sky; the raid.
Party of up to 6. Each has a short approach, two to three mini-bosses
and a final boss with phases. Mechanics are at design level; 03-systems.md sets numbers.
Where: under Chandler’s Sink, Tallowmere. What it is: the Concord chandlery that made wicks for tapped fire, sunk in its own wax. - Approach, the Pour Line: a conveyor of wax molds. Molds harden into platforms on a cycle and soften again; the party moves with the line. - Mini-boss, Foreman Toad: a Waxtoad in a foreman’s apron; slams the conveyor speed up. - Mini-boss, the Wickloom: a Fenspinner weaving wick across the room; cut threads to open the way, but every cut thread drops someone. - Boss, the Chandler (34). An Afternooner master chandler fused to his own vat. 1. Dipping. He dips a player into wax, sealing them in a mold. The others break it out before it sets. 2. Taper Rain. He throws lit tapers from the ceiling rails; each one melts a patch of floor. The party herds the melt away from the exit drip. 3. Wick. He lights himself. The whole room softens; the party climbs the vat’s drips to the ceiling while he burns down, and puts him out from above. - Story: his ledger: “Tap 41, Aun. Yield 1,900 steps. Subject expired.”
Where: down the forge-tap from the Burn in Brazenbrow, into Greyhorn. What it is: the inside of a living titan, and the place a Lampghost is being born. - Approach, the Tapline: ride down inside the tap pipe; heat pulses travel up it and must be dodged into side vents. - Mini-boss, Hornmites: a swarm of mites in the tissue; the floor is Greyhorn and flinches where they bite. - Mini-boss, the Quartz Clot: a growth of spine-stone blocking a vessel; break it while it re-grows. - Boss, the Gnaw (60). A Lampghost in the shape of a missing horn, forming at the tap. 1. Heartbeat. Greyhorn’s heart beats every few seconds and sends a shockwave across the floor; jump on the beat. The Gnaw attacks between beats. 2. Open Tap. While the tap is open, the Gnaw heals from it. Two players hold the valve wheels shut while the other four fight; valves drift open if released. 3. Unmaking. With the tap shut, the Gnaw tries to flee into the heart. Players put it out before it reaches the chamber; its motes flow into the heart and the beat steadies. - Story: Forgemother Stane sees what her forge made; Hob Sallow is waiting outside.
Where: under Highnoon’s Orrery Steps. What it is: the Concord’s great clock, which tracked the titans’ routes and scheduled the Tapping, and the device that focused tapped fire: the Noon Lens. - Approach, the Ring Halls: the map is a set of concentric brass rings that rotate on a cycle; floors become walls. The party times its crossings. - Mini-boss, the Calendar: a Concord automaton that stamps “days” onto the floor; a stamped day repeats the last ten seconds of attacks. - Mini-boss, the Hourguard Captain: Afternooner soldiers in formation; break the shield wall from behind. - Boss, the Reckoning Engine and the Gilded Hour (90). 1. Alignment. The Engine is vulnerable only when its rings align, every half minute; between alignments it fires sunbeams down the gaps. 2. Ambush. Tapwright Holt and Gilt-Captain Sallis arrive, take the Noon Lens and set the Orrery spinning. The room tilts in a slow circle; ropes become floors. 3. Spin-down. Players jam the four drive gears while Sunlancers defend them. The Engine stops; Holt and Sallis are gone with the Lens.
Where: through the Heartgate into Wend’s heart. What it is: a cave of fire cooled to crystal, and the memory of the Last Lighting. - Approach, the Valves: chambers that alternate hot and cold; cross on the cold beat. - Mini-boss, the Last Lighting: Leftlamps replay the siege night: Lampghosts pour in and Leftlamps light more and more lanterns. Every lantern the players defend makes the wave bigger. The encounter ends only when the players let the lanterns go out. (The one place in the game where the answer is less light. Telegraph it with Hob, not a tooltip.) - Mini-boss, Holt’s Harness: the Gilded Hour’s chain rig around the heart; break four anchors while Gilt Harvesters repair them. - Boss, the Cinder Choir (106). The re-formed Cinder Eye, many eyes singing together. 1. Chorus. Five eyes heal each other while any two sing in harmony; put them out in pairs. 2. Homing. The Choir pulls at every lantern in the room; lanterns drift toward it and must be held. A held lantern is a player who can’t attack. 3. Weeping. It merges into one Eye and weeps embers at the players. The fight ends when the harness snaps and it is dragged west through the wall, still weeping.
12–18 players. The Gilded Hour have lifted the Cinder Eye, fed with Wend’s veins and a year of stolen lanterns, to the top of the Sunlift, and lit it. A white sun hangs in the east of every sky in the game. The raid happens inside and on top of it.
Phase 1, the Sunlift. Three lift platforms rise side by side up the scaffold. Each lift moves only while balanced: equal weight and equal lantern light aboard. Sunlancers and Cindersworn board from the scaffold. Players cross between lifts to keep them level; a lift that tilts too far stalls and must be cranked. Ends at the Gilt Spire’s crown.
Phase 2, Provost Calla Aumbry. She fights with the Noon Lens and Gilt-Captain Sallis. - Proclamation of Noon: every shadow on the platform vanishes. Stealth, shade-based skills and hiding fail; heat stacks on everyone. - Tether shade: players raise four titan tethers (the holds’ anchor chains, lowered by the converged titans) to throw shadow and bleed off heat. - Sallis kneels at half health if no player has struck him; if he is spared, he holds the stair for phase 3 (and grants a title). - At a quarter health, Aumbry steps into the Lens’s light and goes into the sun. She is not killed. Her letter drops later.
Phase 3, the Second Noon. Inside the false sun: an
arena that brightens every few seconds. Glare stacks on everyone and
cannot be cleared, only outrun. - The sun is made of four cores of fire.
The raid splits into four groups, each carrying a core along a different
route to a titan tether, and each tether has its own rule: -
Mossback: a slow, steady carry; any hit makes the
carrier drop it. - Greyhorn: a timed sprint between his
charges, which sweep the route. - Ystra: the route
moves to her song; step on the beat or fall. - The Moth
Queen: the route is pitch dark; only players with shuttered
lanterns (or Shades) can see the path, and they guide the carrier with
pings and raid markers (there is no voice chat; 03-systems.md owns the marker
set). - Holt dies here, crushed by his own Sunlift when the cores leave
it.
Phase 4, the Return. The four titans give the cores back as one flame. Wend’s Absence rises over the arena edge. The raid escorts the last flame across the arena into the Absence’s heart (proposed), where its stolen ember gutters, while Titanshades and the sun’s remains try to snuff it. No boss health bar: a single bar for the flame. When it enters the heart, the Absence fills, and Morrow stands up.
The first clear on a world during Act V’s server
event triggers Morrow’s birth (01-world.md 8.9), once. Later
clears replay it as the Almanac’s record (“the Remembering”) with the
same rewards.
03): Footfall, Reflections,
Softwax, the Charge, Cloudline, Silkways, Shutter, Mirror relay and Held
Hours, Cooling, Long Shadows and Glare are one mechanic per region; keep
them that size. The Shutter mechanic in Lowlight assumes lanterns have a
brightness the player controls. Glare (Sunfoot, Cloudshelf tops) needs a
Glare tier: a lantern state above full that overcharges
and drains. The raid needs a marker and ping set, not voice.05): the stolen ember rule;
heartfire amber versus coldlight blue-white; the Second Noon appears in
the east of every sky during the finale Turning; the Pale
Tenant and Morrow each change a permanent visual on the server.04): the Convergence
moves all four hold docks to one map for a Turning, and the raid’s first
clear changes every map’s sky for one world. Wend’s Absence, the titans
and the Pale Tenant’s state are world singletons: one
entity per world shared by every channel, owned outside any channel
process, with position and state persisted. Act state and route
parameters change only at a Turning boundary.What map and creature builders need for Phase 1 item 3 (06-roadmap.md): the rest of the
Mossway, then the Glasslands to the Cinder Eye. Everything here not
already in §2.1–2.2 or in the game is marked (proposed)
and listed in 07-decisions.md (D40–D45).
Life, touch, aggro and drop rates are 03-systems.md’s (§3.3 Designed,
§13.6, §15.1); this section says where things are, how they behave and
what they look like.
| Rule | Value |
|---|---|
| Units | Sim units (1 u = 4 ref px; a tile is 8 u). A screen is 480 × 270 u. Map sizes are width × height. |
| Grammar | 03-systems.md §2.1: up ≤
36 u and across ≤ 32 u without a rope, level gaps ≤ 48 u. Anything
taller has a rope, ladder or vine. |
| Built scale | Mossy Field 1920 × 320, Footprint Ponds 2080 × 380, the Old
Tollbridge 1700 × 360: eight or nine spawn points of three, 6 s respawn,
CAP_PER_PLAYER 8 (03 §17.2). New fields match: 8–10 points
of 3, one point per tier stretch, 6 s (8–12 s for a map’s strongest
kind). |
| Kill rate | §5.1’s K(L) is 15.7–17.3 a minute over levels 10–20. The bot measured 18–24 on the built fields; a new map is sized so a solo bot makes K ±20% on its band (03 §22.1). |
| Lampghost share | The Mossway 85%, the Glasslands 60% of spawn slots (03 §17.1). Each map’s mix below is counted in slots. |
| Ambient | Mossway surface dusk, Glasslands surface
dim, camps hearth (03 §6.4). Every Dim map has
1–3 beacon spots (03 §6.8); until beacons are built they are lit
lights at intensity 1. |
| Portal keys | Each map’s keys count from 1 in the order listed. Built maps keep their keys; new keys are appended. Directions are play directions; the region map draws the Glasslands Lampward (west) of the Mossway, and the player walks the Lantern Road left, toward the sun. |
| Sketch legend | === solid ground, --- one-way platform,
| rope, H ladder, /
\ slope, P portal, S spawn point,
L static light, B beacon spot, *
the map’s feature. Sketches are to rough scale, not coordinates. |
Ids continue from the built 1–4, append-only like tile and item ids
(game/sim/maps.gd). All new ids are (proposed,
D40); if a sibling PR claims one first (the prologue’s Stair
and Wick), the later PR renumbers before any map file exists.
| Id | Name (name) |
Title | Kind | Levels | Size (u) | Ambient |
|---|---|---|---|---|---|---|
| 1 | town |
Lantern Town (the Rim) | Hold | — | built | hearth |
| 2 | field |
Mossy Field | Field | 1–4 | 1920 × 320, built | dusk |
| 3 | ponds |
Footprint Ponds | Field | 4–7 | 2080 × 380, built | dusk |
| 4 | tollbridge |
The Old Tollbridge | Field | 8–10 | 1700 × 360, built | dusk |
| 5 | hedgerows |
Dewline Hedgerows | Field | 5–8 | 1440 × 720 | dusk |
| 6 | shellshed |
Shellshed Slopes | Field | 6–9 | 2240 × 480 | dusk |
| 7 | soak |
The Soak | Field | 9–10 | 2000 × 360 | dusk |
| 8 | drain |
The Drain | Boss arena | 10 | 960 × 360 | dusk |
| 9 | tollhouse |
The Tollhouse | Camp (safe) | — | 960 × 300 | hearth |
| 10 | sump |
The Sump | Upper stratum | 12–14 | 2400 × 400 | dim |
| 11 | lostprint |
The Lost Print | Hidden | 8–10 | 640 × 360 | dusk |
| 12 | lanternroad |
The Lantern Road | Field | 10–14 | 2560 × 360 | dim |
| 13 | milepost |
The Last Milepost | Camp (safe) | — | 960 × 300 | hearth |
| 14 | dunes |
Chime Dunes | Field | 13–16 | 2400 × 440 | dim |
| 15 | mirrormere |
Mirrormere | Field | 14–17 | 2200 × 320 | dim |
| 16 | lamphouse |
The Broken Lamphouse | Field | 15–18 | 1280 × 880 | dim |
| 17 | slagway |
Slagway | Field | 17–20 | 2400 × 480 | dim |
| 18 | kiln |
The Kiln | Boss arena | 20 | 960 × 440 | dim |
| 19 | stilllamp |
The Still Lamp | Hidden | 16–20 | 480 × 300 | dark |
| 20 | yard |
The Lodge yard | Creation (10-operations.md §4) |
— | 960 × 320, built | dusk |
Later, with no id yet: Old Tollvault (the Mossway’s lower stratum), Underglass and Slagdeep (the Glasslands’ strata) and Glassbreak Fields (event map, §6.5). Id 20, the Lodge yard, is the creation map, reached from no portal; it is not part of either region.
The surface count stays inside the map budget at the top of this document: the Mossway has six fields (Mossy Field, Footprint Ponds, Dewline Hedgerows, Shellshed Slopes, the Old Tollbridge, the Soak), the Glasslands five (the Lantern Road, Chime Dunes, Mirrormere, the Broken Lamphouse, Slagway). Arenas, camps and hidden maps do not count.
| From (key) | To (key) | Where on the From map |
|---|---|---|
| 2 field (3) | 5 hedgerows (1) | East high platform, x 1660 (proposed) |
| 3 ponds (3) | 10 sump (2) | The newest print, crater 4’s floor: the way up from the Sump arrives here |
| 4 tollbridge (2) | 9 tollhouse (1) | East end of the deck |
| 4 tollbridge (3) | 7 soak (1) | East end of the riverbed |
| 5 hedgerows (2) | 6 shellshed (1) | Top tier, east |
| 5 hedgerows (3) | 11 lostprint (1) | Top tier, west, past a lightbridge |
| 6 shellshed (2) | 9 tollhouse (2) | East foot |
| 7 soak (2) | 12 lanternroad (1) | West edge |
| 7 soak (3) | 8 drain (1) | The whirlpool, mid-map; open during the Mayor’s window |
| 7 soak (4) | 10 sump (1) | A culvert in the east bank |
| 12 lanternroad (2) | 14 dunes (1) | West edge |
| 12 lanternroad (3) | 13 milepost (1) | The camp gate, mid-road |
| 14 dunes (2) | 16 lamphouse (1) | West edge |
| 14 dunes (3) | 15 mirrormere (1) | A low dip on the south side |
| 15 mirrormere (2) | 17 slagway (2) | West edge |
| 16 lamphouse (2) | 17 slagway (1) | The top floor’s broken bridge |
| 16 lamphouse (3) | 19 stilllamp (1) | Behind a gloamway in the cellar |
| 17 slagway (3) | 18 kiln (1) | West edge; open during the Eye’s window |
Each link is two-way unless the row says otherwise; the Sump’s way up into the Ponds is one-way up (banking on arrival, 03 §7.2). An arena’s portal leads into the boss instance during its window (03 §15.1) and is a dark archway otherwise.
The Mossway’s family: Puddlings and what Mossback leaves behind. Region mechanic, Footfall (proposed numbers): while Mossback walks rather than kneels, a tremor every 30 s sways every rope for 2 s (climb speed halved), bounces every small monster once and shakes 1–3 shellfruit loose on the Hedgerows and the Slopes (a pickup that heals 10%). It needs the world clock as sim input and waits for the titan routes (03 §8.3); the maps are built without it and gain it as a map flag.
Hedges grown in lines along Mossback’s old path, three rows stacked up a bank: vertical climbing through branches. 1440 × 720.
 P3 (Lost Print) <-lightbridge-  ---- top tier y 296 ----  * vista   P2 (Slopes)
  |   S Snagcat            S Snagcat            S Thornpig         |
 ==[hedge row 3: branch shelves every 32 u, vine ropes on its faces]== y 392
  |      S Thornpig             L            S Dandlehop           |
 ==[hedge row 2]=====================================  ====   ===== y 488
  |  S Dandlehop      S Snagcat              S Thornpig            |
 ==[hedge row 1]=====================  =========================== y 584
P1 (Field) S Thornpig L S Dandlehop ground y 680kit/branch climbable (D54); the field’s layers and ropes
stand in.A long rise where Mossback’s shed scutes pile up: curved plate platforms on a slope. 2240 × 480.
                                              ---(scute)---  * Scute Stack  H  P2
                                  ---(scute)---   S Rustpuff   ===== y 248 =====
             ---(scute)---  S Shellmite    S Thornpig   /
 P1  S Shellmite   S Rustpuff     L       ____________/   S Shellmite
==== y 440 ======\___________/==========/ S RustpuffThe boggy edge toward the Glasslands, where the Mossway’s water drains in the end. 2000 × 360. Mossback’s region boss lives under it.
 P2 (Lantern Road)                                        P1 (Tollbridge riverbed)
  ---raft---     ---raft---        * whirlpool P3     ---raft---    ---raft---
 S Bog Puddling   S Dimwing     ~~~~~~~~(deep pool)~~~~~~~  S Bog Puddling   S Dimwing
 ====\__~~__/====\__~~__/======\________________/====\__~~__/===P4 culvert====
S Bog Puddling S Bog Puddling L S Bog Puddlinggame/sim/maps.gd). TODO: the flowing water and
the background Puddlings; the Ponds’ water and layers stand in.The Puddle Mayor’s den at the bottom of the Soak’s whirlpool. A shallow bowl. 960 × 360.
       L lily                     (Mayor's hop arc)                    L lily
 P1  ---pad---        ---pad---                ---pad---        ---pad---
 ===\                                                                /===
     \==================== flat floor y 320, 640 u ================/
L L Lgame/content/maps/8.map.json): as above, the pads as
ponds/lily defs at x 232, 340, 620, 728, the Soak’s look
until the Drain has its own. Portal 1 and the Soak’s portal 3 (the
whirlpool, on the deep pool’s floor at x 1028) lead to each other; the
whirlpool is open in the Mayor’s window, 30 minutes every 6 h of world
time (Mayor.window_open), and a dark archway that goes
nowhere otherwise. TODO: windows from worldd’s calendar.The Mossway’s camp (03 §17.1): the Concord toll-keeper’s lodge at the bridge’s east end, reroofed by the Guild. Safe. 960 × 300.
hearth rect over the
lodge.hearth
ambient; ground y 260, the lodge (the town’s house def) at x 480 with a
ladder to its roof, the hearth rect at x 380–420, a lamp at each side.
Portals 1 west and 2 east. TODO: the Tetherline station, beacon, vendor
stall, contract board and both NPCs.Under the Mossway, where the pond water drains through roots and old Concord culverts. The stratum Phase 1 needs: the lantern burns, motes are carried and banked at the beacon or the way up (03 §6.5, §7.2). 2400 × 400.
 P1 culvert (from the Soak)                                  P2 way up (Ponds, one-way)
  H     ---root---    S     ---root---      B Low Lamp     ---root---    S    H
 ==\__  S Sump Puddling __/====\___ S ___/=== * glowdrop pool ===\___ S __/==
S Sump Dimwing S Bog Puddling S Sump Dimwing S Sump Puddlingdim,
carry_motes true. The Low Lamp (11-prologue.md §5, D33), Phase
1’s one beacon, on the middle ledge at x 1200, directly under the ground
where Mossback kneels: cracks in the roof over it let down his light and
dust. Glowdrop pools glow chartreuse, never cyan (05 Mossy Field
palette), and give no gameplay light.11-prologue.md §5 have it,
against §1’s rule that an upper stratum is its region’s top half (5–10):
nothing below the Lodge should burn fuel (D42).11-prologue.md §5.2), Fen
Cobble’s: kindle the Low Lamp, bank at it.beacon_view.gd, no
light); six one-way root shelves 34 u over the floor; portal shelves at
both ends at y 300 with a ladder each. Portal 1 the culvert from the
Soak’s 4; portal 2 up to the Ponds’ 3, which leads nowhere back
("to": null, drawn dim) and banks carried motes on arrival.
Spawns as the sheet, 3 each, respawn 6 s; one roof-crack light (radius
56) over the beacon. The beacon is a map key, beacons (D75,
D76). TODO: The First Kindle and Fen at the beacon wait for the
quest system (D77); the cave’s art, roof cracks and root kit.The first footprint Mossback ever left in the Mossway, grown over in white moss. Reached over a lightbridge from the Hedgerows’ top tier (03 §6.9). 640 × 360. No spawns.
| Map | Change (proposed; as built where marked) |
|---|---|
| Mossy Field (2) | Portal 3 on the east high platform to Dewline Hedgerows. Built, at x 1660. |
| Footprint Ponds (3) | Portal 3 in the newest print, the Sump’s way up. A rare Teacup
Puddling (4) replaces a Dandlehop at one point in 50 respawns (needs a
spawn row’s rare, D45). Built: the
Dandlehop point at (550, 212) has rare {kind 10, every 50},
counted per point, no roll (D56). The pads dip (§2.1) when that is
built. |
| The Old Tollbridge (4) | The Tollkeeper becomes its own kind (14, §6.6) at the deck’s three points; portal 2 at the deck’s east end to the Tollhouse, 3 at the riverbed’s east end to the Soak. Built. |
Omens (proposed): Rust Week (Rustpuffs at every Mossway field point that holds a Dandlehop); Teacup Season (the Teacup Puddling at 1 in 10); High Water (Bog Puddlings on the Ponds’ low pads).
The Glasslands’ family: things of glass and heat, and the Lampghosts of pilgrims and the missing. A Dim region: the first where the dark hides Lampghosts outside your light (03 §1.3, §6.6). Region mechanics: Reflections (Mirrormere and Glassbreak Fields only) and the Eye’s Sweep (the Kiln only). Wind chimes play everywhere on the ambience bed.
Look (proposed, for 05-art-audio.md to adopt as
the region palette):
| Role | Hex |
|---|---|
| Sky top / mid / horizon | #2A2240 / #6A4258 /
#E08A4E |
| Sun band | #F7B25E |
| Glass light / mid / dark | #E9C79A / #9C7A5E /
#3E2E2C |
| Crack glow (slag below) | #FF8A3D |
| Dead lantern iron | #4A4148 |
| Ambient | #3A2E4A at 0.55 |
| Accent | chime brass #C99B4A, pilgrim ribbon
#C9584A |
Layer stack notes (05 Layer stack): far terrain (2) is dune ridges with the ghost-shapes of lanterns melted into them; mid (3) a line of dark lantern posts running to the sun; back props (4) half-melted posts and pilgrim cairns; foreground (8) hanging chimes and ribbon; weather (9) glass grit and drifting embers on the Kiln’s side. Mossback’s shell is on the north rim’s skyline on the Lantern Road only.
The old pilgrim road west, lined with lantern posts, most of them dark. Walked right to left, toward the sun. 2560 × 360.
 P2 (Dunes)  <- toward the sun                                    P1 (Soak)
  post  post  post  L post  post  post  post  B  post  post  L post  post  post
  -arm- -arm- -arm-  -arm-  -arm- -arm- -arm-    -arm- -arm-  -arm- -arm- -arm-
 S Wickwren  S Glassback  S Cinderling  P3 camp gate  S Wickwren   S Glassback
=========/\=========/\==================[Last Milepost]======/\=====/\========= y 320The Guild’s camp at the last post on the road that is still lit. Safe. 960 × 300.
hearth rect around the post.Glass dunes hung with pilgrims’ chimes. Sound carries, so packs come. 2400 × 440.
            [chime arch]               [chime arch]              [chime arch]
   P2     |  ------  |     B     /\   |  ------  |    /\        |  ------  |   P1
       S Chimehound   S Lamplicker   S Chimehound  S Cinderling   S Chimehound
=====/ \=====/ \======/ \===P3 (Mirrormere)==/ \======= A flat lake of mirror glass. Mirrorkin show only in the reflection below your feet. 2200 × 320.
   P2 (Slagway)                                                   P1 (Dunes)
        ---shard---        ---shard---   B    ---shard---     ---shard---
  S Mirrorkin   S Mirrorkin    S Glassback    S Mirrorkin   S Mirrorkin
 ======================== mirror floor y 240 ================================
(reflection layer: every actor drawn flipped below the floor line)A ruined Guild waystation tower: a vertical climb past the missing Lanternbearers’ empty lanterns. 1280 × 880.
              P2 (Slagway) <- broken bridge ===  top floor y 160  S Lostbearer
                           H                         |
         ==== floor 4 y 304 ====    S Lamplicker  ===  ==   S Pilgrim Afternooner
                 |                    H
         ==== floor 3 y 448 ==== B  S Lostbearer   ======  * empty lanterns
              H                          |
         ==== floor 2 y 592 ====  S Lamplicker  ====  S Pilgrim Afternooner
                    |                 H
P1 ======= ground floor y 736 ======= S Lamplicker ====== cellar: gloamway -> P3Cracked glass over glowing slag; vents puff heat that lifts you. 2400 × 480.
 P3 (Kiln)                         ---crust---           ---crust---    P1 (Lamphouse)
   S Lostbearer   ^vent  ---crust---   ^vent   S Slagworm    ^vent
 =====crack====\_____crack______/====crack=====\____crack____/==== y 360 ===
  S Slagworm    ^vent   S Lostbearer      ^vent       S Cinderling    P2 (Mirrormere)
========================== lower crust y 440 ===============================The Cinder Eye’s lair: a crater bowl of glass. 960 × 440.
                         (the Eye hovers 40 u over its target)
  rim ---                                                          --- rim
       \     [pillar]     [pillar]          [pillar]     [pillar]     /
        \      |  |         |  |               |  |        |  |      /
 P1      \=====|==|=========|==|=== floor ======|==|========|==|=====/
x 240 x 400 x 560 x 720A hollow under a dune, behind the Lamphouse cellar’s gloamway: one pilgrim lantern the Eye never found, still lit, beside a Pilgrim Afternooner asleep on its pack. 480 × 300. No spawns; the Afternooner never wakes.
Omens (proposed): Chime Storm (Chimehound packs gain a fourth point); Heat Haze (Slagway’s vents puff every 2 s); Long Shadows on the Road (the Lantern Road’s lit posts go dark for the week).
Opens for one Glow on Turning day 7 after Greyhorn crosses the south Glasslands (01 §5.4), from Chime Dunes’ fourth portal. 15–20. Shattered glass plates open shortcut paths down to buried lanterns: each buried lantern is an interactable that gives an Archive page or a brass cache. Reflections apply (as Mirrormere). Greyhorn’s south dock is here when docked. Built after the Kiln; an id when it is.
New kinds continue game/sim/creatures.gd from 10 (8 and
9 are the Training Dummy and the Archery Butt), append-only (all
(proposed) until built). Levels are one per kind,
inside the band §2 gives the name. Behaviour names an archetype in
game/sim/behaviours.gd (HOP, FLY, WALK, HOVER_DASH) or a
hook (game/sim/brains.gd), and says when it needs something
neither has (D45). Numbers are 03-systems.md §3.3 Designed;
drops §13.6.
| Id | Kind | Lvl | Type | Where | Behaviour | Art note (05 size class) |
|---|---|---|---|---|---|---|
| 10 | Teacup Puddling (H) | 4 | Lampghost | Footprint Ponds (rare) | HOP as the Puddling | Small. The Puddling’s rig wearing a chipped teacup like a shell |
| 11 | Snagcat (H) | 7 | Lampghost | Dewline Hedgerows | HOP: long, high pounces from shelf to shelf, a longer rest between | Small. A cat that ate a bramble: thorn tufts for ears, a coldlight body, its ember in the belly |
| 12 | Rustpuff (H) | 8 | Lampghost | Shellshed Slopes | FLY, slow, a gentle wobble: drifts at you | Small. A puffball of rust-colored moss spores; the rust is painted over coldlight, the ember deep inside |
| 13 | Bog Puddling (H) | 9 | Lampghost | The Soak, the Sump | HOP, heavier and lower than the Puddling | Small. The Puddling rig, larger, brown bog water with a weed fringe |
| 14 | Tollkeeper (H) | 10 | Lampghost | Old Tollbridge deck | WALK, no jump, short leash: holds its stretch of deck | Medium. The Afternooner rig in a faded toll coat with a lamp-pole |
| 15 | Runlet (H) | 10 | Lampghost | The Drain (boss add) | Built: WALK to a home the Mayor’s fight moves, out to
the rim, then racing back; touching the Mayor heals it (D60) |
Small. A thin stream of Puddling water with a tiny ember |
| 16 | Puddle Mayor (H) | 10 | Lampghost boss | The Drain | §6.7 (built) | Field boss. A cottage-sized Puddling in a tricorn and chain of office |
| 15 | Wickwren (H) | 10 | Lampghost | The Lantern Road | HOP: short, high hops between lamp-arms; perches | Small. A wren that ate a lantern wick: a charred wick for a tail |
| 16 | Glassback | 11 | Living | Lantern Road, Mirrormere | WALK, slow; projectiles striking its back from above or behind deal
no damage (new reflect, D45) |
Small. A beetle with a shell of fused lantern glass, warm-lit |
| 17 | Cinderling | 12 | Cinderkin | Lantern Road, Dunes, Slagway, Kiln | FLY, fast, little wobble, wide aggro: flies straight at you | Small. A fleck of the Eye’s fire with tiny eyes; heartfire colors, no stolen ember (it is all fire) |
| 18 | Chimehound (H) | 13 | Lampghost | Chime Dunes | WALK, fast; hook: its first hit calls the pack (adds 2 Chimehounds
once, or a call answer, D45) |
Small–medium. A dog that ate a wind chime: chime tubes for ribs |
| 19 | Mirrorkin (H) | 14 | Lampghost | Mirrormere | WALK; drawn only in the reflection (render flag) | Medium. A blurred copy of a player silhouette in coldlight, ember sharp |
| 20 | Lamplicker (H) | 15 | Lampghost | Dunes, the Lamphouse | WALK, low and long, no jump (drops off edges); touch Guttered 5 s (03 §3.6) | Medium. A long lizard with a longer tongue |
| 21 | Pilgrim Afternooner (H) | 16 | Lampghost | The Lamphouse | WALK west across the whole map, no aggro on sight and no touch
damage until hit or blocked (new passive, D45) |
Medium. The Afternooner rig in a sun hat with a pilgrim’s pack |
| 22 | Slagworm | 18 | Living | Slagway | New BURROW: rises from a crack point, arcs at you, hardens 6 s where it lands. Until built, HOP with a long rest from crack points (D45) | Medium. A worm of molten glass cooling to amber at the tail |
| 23 | Lostbearer (H) | 19 | Lampghost | The Lamphouse, Slagway | WALK, steady; drops a Name (quest) | Medium. A Lanternbearer’s coat and dark lantern, worn by coldlight |
| 17 | Sump Puddling (H) | 12 | Lampghost | The Sump | HOP as the Bog Puddling | Small. The Bog Puddling recolored darker (shader, 08 §4) |
| 18 | Sump Dimwing (H) | 13 | Lampghost | The Sump | FLY as the Dimwing | Small. The Dimwing recolored (shader) |
The Puddling, Mossnip, Dandlehop, Shellmite, Thornpig, Dimwing and
Cinder Eye (0–7) are built; the Afternooner (2) stays the generic kind,
now the Tollkeeper’s model. As built (10–14): stats at
normal_health/touch_damage of the level and
aggro, leash and paces from 03 §3.3. Teacup: HOP, short hops;
rare, so it is left out of the brass budget (D58). Snagcat:
HOP 130 across, −330 up, 1.4 s rest. Rustpuff: FLY 40, wobble 18. Bog
Puddling: HOP 60 across, −190 up, heavier friction. Tollkeeper: WALK 42,
jump 0, leash 10. Each is a Lampghost from
tools/art/monsters.json with its own tint
(enemy_view.gd): the Teacup the Puddling’s aqua, the
Snagcat violet, the Rustpuff rust, the Bog Puddling olive-brown, the
Tollkeeper periwinkle. As built (17, 18): the Sump
Puddling is the Bog Puddling’s rig and AI at level 12, tinted a darker
moss olive; the Sump Dimwing the Dimwing’s at 13, tinted dusk rose,
dropping the Dimwing Membrane (item 54). Each has its own sprite file (a
copy of its model’s channel map) so the catalog shows it. Ids 15 on in
this table predate the reservations: the Runlet and Puddle Mayor are 15
and 16, the Sump kinds 17 and 18, and the rest renumber when built.
Lampghost elites (03 §3.3: 10x life) for the Drawn
spawns while Mossback docks: an elite Snagcat in the Hedgerows and an
elite Chimehound on Chime Dunes, one point each (proposed).
Both are open-world bosses (03 §15.1: an instance per window, up to
60 attackers) with a Trial for 1–6 (03 §15.6, D27). Telegraphs use 05’s
shapes: the Mayor’s are cold (#7FE3F0), the Eye’s warm-red
(#E0533F). Numbers in 03 §15.1.
Built (game/sim/mayor.gd, kinds 16 and
15, map 8). A boss flag in creatures.gd
replaces Enemy.is_boss’s Cinder Eye check, and a boss’s
kill is shared by anyone who did 1% of its life at any time (03 §15.1;
healing and time in range are a TODO). The Mayor is a HOP (hop 110 u,
rest 1.4 + 0.8 s) with open-world life 662,500, touch 40, and phases at
0.75, 0.5, 0.25. mayor.gd, stepped after the monsters move,
watches its hops: a take-off puts a ring (radius 40, 91) on the floor
where the arc lands, closing for its airtime (about 1000 ms); a landing
bursts it and sends a wave (57) out both ways at 200 u/s after an 800 ms
line, hurting feet on the floor (a jump or a lily pad clears it), 200 u,
320 u from Recess. Each phase split spawns Runlets (3 in a Trial,
Mayor.trial; 2 per 10 attackers in the open, to 12) that
walk out about 260 u, wait 4 s and race back at twice the pace, glowing;
one that touches the Mayor heals 2% and is gone. It sits sunk (half
height, no hops, up to 12 s) while they are out. Gavel adds a belly-flop
every 9 s on the farthest player under a 1000 ms dome (radius 36, 91);
Recess hops at rest x0.7; Adjourned is drawn without the hat and sheds a
Runlet every 6 s with a flash on the chain. With nobody standing it
resets: life, Runlets and telegraphs. Telegraphs ride the snapshot
(protocol v16, D61) and are drawn in #7FE3F0. Drops:
Glowdrops x5–10 and a Hornsteel Sword (the iL 10 piece); Runlets drop
nothing. The mayor-fight scenario is two Wardens;
mayor-phases stages the Split and Adjourned for the shots.
Its Trial life is scaled to the built Warden’s Sweep (about 225 a second
against 260): 55,000 for 2, not 63,600, until the class DPS budget (03
§4.9, #89); the bot fight’s time is reported, not gated, as Phase 0’s
bot times are. TODO: the Tricorn and Chain of Office (no hat or
accessory slots), brass at 60x, the Lampghost half damage outside pools
(Shrouded), the tricorn bobbing before it surfaces, Trials as instances
(03 §15.6), and the 60 s reset delay.
The fight (proposed). A Puddling the size of a cottage that ate a drowned Concord mayor’s chain of office and tricorn hat. It is a Lampghost: it takes half damage outside light, and the Drain’s lily pools are where it can be hurt in full.
| Phase | Health | What it does | Telegraph | Counter |
|---|---|---|---|---|
| 1. Wade | 100–75% | Big hops at a target (HOP); each landing splashes a wave both ways along the floor | Ring closing on the landing spot, 1000 ms; then a line along the floor, 800 ms | Leave the ring; jump the wave or stand on a pad. Fight it in a lily pool |
| Split | at 75%, 50%, 25% | Bursts into Runlets (3 in a Trial; 2 per 10 attackers in the open, to 12) that scatter to the rim, wait 4 s, then race back; each that touches it heals it 2% of its life | The Mayor sinks to half height; the Runlets glow brighter as they turn back | Put the Runlets out before they arrive; AoE in the pools |
| 2. Gavel | 75–50% | Phase 1, plus a belly-flop on the farthest player | Dome of light over that player, 1000 ms | Move out; the rest close in |
| 3. Recess | 50–25% | Hops faster (rest x0.7) and its wave travels farther | As phase 1 | As phase 1 |
| 4. Adjourned | under 25% | Sheds the hat; every 6 s one Runlet leaves and turns back at once | Chain of office flashes when one leaves | Burn it down while one or two players chase Runlets |
It is put out with a pop and a long glug: the chain and the tricorn drop into the shallow water. Party: 20–40 in the open (03 §15.1); a Trial for 1–6.
The bot fight (mayor-fight, proposed).
Two level-10 bots (a Warden and a Ranger once classes land; two Wardens
until then), at-level Glass-grade swords or bows, 5 Moss Tonics each,
fight the Trial at party size 2. They stand in lily pools, leave closing
rings, and put out Runlets before chasing the Mayor.
Pass: put out in 3–5 min on every seed, at most 2
relights between them, and at least half the Runlets put out before they
arrive (a metric, not a gate, until tuned). As built
(tools/bots/mayor_bot.gd): each bot stands about 54 u from
the Mayor’s centre on its own side, midway between where it is and where
its next hop lands, so it is under neither the ring nor the body; it
never walks into the body, jumps each wave’s crest, and Sweeps
(Lanternbash on Resolve) while it is down. From the Gavel the partner
steps out just before a belly-flop to the spot whose landing starts the
best-lit back-and-forth, as the flop lands on the farthest player. Near
a Split both hold their swings until the Mayor is east of them, so two
of the three Runlets run their way, and put those out while it is sunk;
the third gets home. Both swing their Hornsteel: until 2026-10-05 the
bots swung the Worn Shortsword in hotbar slot 0 and never put it out in
330 s (26,274 of 55,000 left). Now it is put out in 81 s with 0
relights, 228 damage taken (all waves), 0 tonics and 3 of 10 Runlets
home, lit 54% of the time, so the 55,000 life is well short of the 3–5
min target (a balance call, not the bots’).
Built today (game/sim/creatures.gd,
kind 3): level 20, life 1,200, touch 15, HOVER_DASH: hovers 40 u over
its target for 2.6 s, then dashes three times at 250 u/s (0.9 s each);
under half health it hovers 1.4 s and dashes four times at 300 u/s (0.75
s). It drops a Cinder Heart and gives 50 motes to every living player
there (boss_motes, though it is Cinderkin; D43). The
boss-fight scenario has two bots with Hornsteel Bows put it
out on flat ground in the field. The life and touch are the slice’s, not
03’s.
The fight (proposed, from §2.2). A floating molten eye lidded with plates of fused lantern glass. It is Cinderkin: heartfire hits do half, coldlight one and a half (03 §3.5), so Shades have their first big moment here.
| Phase | Health | What it does | Telegraph | Counter |
|---|---|---|---|---|
| 1. Hunt | 100–50% | Hover and dash as built | Chevrons along the dash line, 600 ms | Sidestep the dash; hit it while it hovers low |
| The Sweep | every 20 s from 90% | It rises to the bowl’s centre, its lids open, and its gaze sweeps the bowl from one side to the other in 3 s. Anyone in the beam is Guttered 5 s (03 §3.6) and takes a small burn, and 1 Cinderling homes on each of them | Edge vignette from the side it starts, 1500 ms, and a line along the floor | Stand in a pillar’s shadow (the side away from the Eye) |
| 2. Melt | 50–20% | Hover and dash as built when angry; each Sweep melts the pillar that shaded the most players, and every 10 s embers fall on three spots and a Cinderling rises from each | Rings closing on the ember spots, 1000 ms | Spread between the pillars that are left; put out Cinderlings fast |
| 3. Weeping | under 20% | It stops dashing and hangs over the centre, weeping embers in arcs to both sides; the Sweep comes every 12 s | Rings, 1000 ms; the vignette as before | Burn it down; the last pillars are the only shade |
With four pillars and at-level damage, the pillars last into phase 3; a slow group runs out of shade, which is the soft enrage. Put out, it weeps: embers fly west out of the bowl and the fight ends with a sound like a kettle. Gilt-Captain Lucan Sallis steps down from the rim and takes the largest ember in a gold box (the quest beat, §6.8). Party: 20–40 in the open; a Trial for 1–6.
The bot fight (boss-fight, updated,
proposed). Two level-20 bots at at-level Glass-grade gear, 5
Moss Tonics each, fight the Trial at party size 2 in the Kiln (not on
flat ground), taking a pillar’s shadow at each Sweep.
Pass: put out in 3–5 min on every seed, at most 2
relights, and at least one pillar standing at the kill on 6 seeds in 8.
Until Trials and pillars exist, the scenario keeps its flat-ground fight
and sets the Eye’s life to the 2-player Trial value.
Talk, put out, collect, light and bank only; no free text (03 §12.1). Rewards are minutes of grind at the quest’s level (03 §12.1). Below level 10 the quests are deliberately small: §5.2’s 55% from quests on a 32-minute band leaves about 20 minutes of quest XP for the whole Mossway, prologue included, below 12.1’s ranges (D44).
The Mossway (proposed; the prologue owns the Lighting, Tamsey’s count and Small Steps)
| Quest | Giver, where | Lvl | Objectives | Reward |
|---|---|---|---|---|
| Hedge Rights | Nettie Briar, hedge-layer, at the Hedgerows’ foot | 5 | Put out Thornpigs in the Hedgerows (0/10); collect Thornwood Cuttings (0/5) | 2 min; a Thornwood shield or offhand |
| Not Everything That Bites | Tansy Scutt, scute-roofer, on the Slopes | 6 | Put out Shellmites (0/8). The log line: “Watch your lantern: no motes.” | 2 min; brass |
| Rust | Old Ponder, Lantern Town | 8 | Collect Rust Spores from Rustpuffs (0/5); talk to Old Ponder. He looks at them a long time and says nothing | 2 min |
| The Tollkeeper’s Coins | Reeve Tamsey (§2.1) | 9 | Collect Concord Coins (0/8) from the Tollkeeper | 2 min |
| Where the Puddlings Go | Ansel Ford, the Tollhouse | 9 | Put out Bog Puddlings in the Soak (0/12); talk to Ansel Ford | 2 min |
| The Mayor | Ansel Ford | 10 | Be eligible on the Puddle Mayor (open world or Trial); bring the Chain of Office to Reeve Tamsey | 2 min; Mayor’s Tricorn (cosmetic) |
Then induction at your Lodge (§2.1).
As built (game/sim/quests.gd): all six, as data rows
with their givers. Nettie Briar stands at the Hedgerows’ foot (x 220),
Tansy Scutt on the Slopes’ west ground (x 200), Old Ponder (x 976) and
Reeve Tamsey (x 1690, by the Stair head) on the Rim, Ansel Ford at the
Tollhouse (x 290); each is drawn in a class outfit until it has its own
look. Thornwood Cuttings (item 51) drop from Hedgerows Thornpigs at 50%
and the Chain of Office (52) from the Puddle Mayor, each only while the
quest still needs it; Rust Spores and Concord Coins are the kinds’ own
40% materials. Every quest pays 2 minutes of grind XP at its level and a
sixth of a grind-hour of brass (D80); The Mayor also gives the Mayor’s
Tricorn (53), worn once hats exist. The Mayor follows Where
the Puddlings Go. TODO: the Thornwood offhand, and the Glasslands
rows with their maps (The First Kindle with the Sump, map
10).
The Glasslands: The Lantern Road (proposed giver names; beats from §2.2 and 01 §8.2)
| Quest | Giver, where | Lvl | Objectives | Reward |
|---|---|---|---|---|
| The Notices (story) | Hedda Lark, the Last Milepost | 10 | Talk to Hedda Lark; put out Wickwrens on the dark posts (0/15); collect Missing Notices from posts (0/4) | 20 min |
| Glass Underfoot | Hedda Lark | 12 | Collect Glass Shells (0/8) from Glassbacks; talk to Ottoline Vey in Lantern Town, who measures one and goes quiet: it is lantern glass, melted | 8 min |
| The First Kindle | Fen Cobble (11-prologue.md §5.2) |
12 | Kindle the Low Lamp in the Sump; bank carried motes at it | One Guild contract’s reward (11-prologue) |
| A Light in the Dunes | Hedda Lark | 14 | Put out Chimehounds (0/12); at launch, also kindle a beacon on Chime Dunes (its beacons wait for launch, D33) | 8 min |
| Warm Lanterns | Hedda Lark | 16 | Collect Empty Lanterns (0/5) in the Broken Lamphouse (from Lostbearers and Lamplickers) | 3 min |
| Names (story) | Hedda Lark | 18 | Collect Names (0/4) from Lostbearers; talk to four families in Lantern Town (Reeve Tamsey knows where they live) | 20 min |
| The Ember Bounty | Gilt-Captain Lucan Sallis, the Last Milepost | 19 | Be eligible on the Cinder Eye; talk to Lucan Sallis (he takes the ember); talk to Wickmother Hessa Lume, who files your report and tells you not to think about where the embers went | 8 min; brass; Act I continues in Tallowmere |
Quest XP over 10–20: 67 grind-minutes plus The First Kindle’s contract, about 57% of the band’s XP, against §5.2’s 55%.
Where players are sent.
§5.1’s minutes per level (t, with the quest mix) against the map that carries each band. Pure grind is 1.15 t. Kinds are at-level for XP within ±5 (§5.1), so each map carries a band of about five levels around its strongest kind.
| Levels | Carried by (alternatives) | Kinds there | At-level kills a level | t (min) | Grind only (min) | Bot, cumulative to the band’s end |
|---|---|---|---|---|---|---|
| 1→4 | Mossy Field | Puddling 1, Mossnip 3, Dandlehop 4 | 24–42 | 6.0 | 6.9 | 6.9–7.8 (§5.1 6.9) |
| 4→7 | Footprint Ponds (the Hedgerows from 5) | Dandlehop 4, Shellmite 5, Thornpig 6, Snagcat 7 | 51–69 | 10.5 | 12.1 | 17.1–18.6 (19.0) |
| 7→9 | Shellshed Slopes (the Hedgerows) | Shellmite 5, Thornpig 6, Rustpuff 8 | 78–88 | 9.5 | 10.9 | 28.9–33.0 (29.9) |
| 9→10 | The Old Tollbridge (the Soak) | Dimwing 7, Bog Puddling 9, Tollkeeper 10 | 98 | 5.5 | 6.3 | 35.0–40.6 (36.2) |
| 1→10 | The Mossway | 31.5 | 36.2 | Pure grind, nightly | ||
| 10 | The Puddle Mayor (Trial or window) | 60x mob XP | — | |||
| 10→12 | The Lantern Road | Wickwren 10, Glassback 11, Cinderling 12 | 108–124 | 12.8 | 14.7 | — |
| 12→14 | Chime Dunes (the Sump) | Cinderling 12, Chimehound 13; Sump kinds 12–13 | 140–156 | 16.0 | 18.4 | — |
| 14→16 | Mirrormere (Chime Dunes) | Glassback 11, Mirrorkin 14, Lamplicker 15 | 173–190 | 19.2 | 22.1 | — |
| 16→18 | The Broken Lamphouse | Lamplicker 15, Pilgrim Afternooner 16, Lostbearer 19 | 207–225 | 22.4 | 25.8 | — |
| 18→20 | Slagway | Slagworm 18, Lostbearer 19 | 242–261 | 25.6 | 29.4 | — |
| 10→20 | The Glasslands | 96.0 | 110.4 | No bot yet | ||
| 20 | The Cinder Eye (Trial or window) | 60x mob XP | — |
Checks for the map builders and the nightly:
grind-warden-glasslands
bot (level 10 to 20, pure grind, buying the camp’s swords) should land
inside 110.4 min ±15% (93.8–127.0). Slagway carries the most minutes on
the fewest kinds: if it runs slow, add a Lostbearer point before adding
a kind.